
🦌 Complete Guide to Field Dressing & Processing Game
Step-by-Step Instructions for Beginners to Advanced Hunters
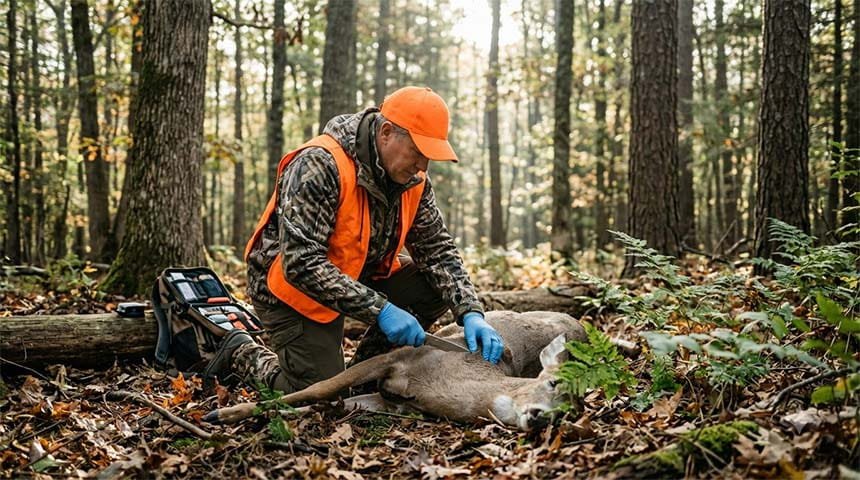
Proper field dressing ensures meat quality and follows ethical hunting practices
Field dressing is one of the most critical skills every hunter must master. It’s the process of removing the internal organs from a harvested animal immediately after the kill to preserve meat quality, prevent spoilage, and show respect for the animal. This comprehensive guide walks you through every step of the process, from preparation to final meat preservation.
Whether you’re a first-time hunter or an experienced outdoorsman, proper field dressing can mean the difference between tender, flavorful meat and a complete loss due to contamination or spoilage. If you haven’t recovered your animal yet, read our guide on how to track a deer after you shoot it first, and make sure your pack is ready with our deer hunting gear checklist. This guide covers the fundamental techniques, common mistakes to avoid, and troubleshooting solutions for real-world hunting scenarios.
📌 Why Field Dressing Matters: The Essential Skill
Field dressing serves multiple critical purposes that go beyond simply preparing meat for consumption. Understanding the “why” behind each step helps you execute the process correctly and with greater confidence.
Preserving Meat Quality
The internal organs of a harvested animal contain bacteria and enzymes that begin breaking down muscle tissue immediately after death. By removing these organs quickly, you stop decomposition before it impacts the meat quality. Delaying field dressing by even a few hours in warm weather can spoil premium meat cuts, wasting the harvest.
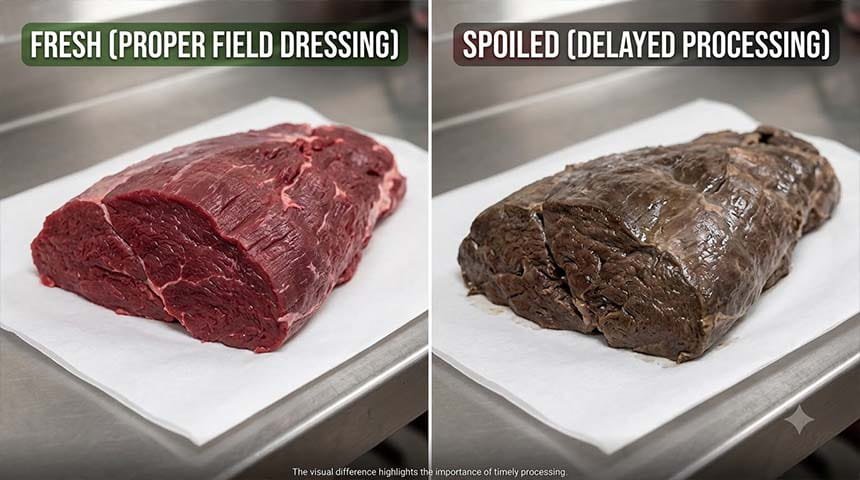
Fresh, properly dressed meat maintains color and texture; delayed dressing causes spoilage and darkening
Cooling the Carcass
Removing internal organs also allows air to circulate inside the body cavity, cooling the meat quickly. Warm animal carcasses in hot weather become bacteria breeding grounds within minutes. Quick cooling extends the meat’s shelf life significantly and maintains the delicate flavors that make wild game so prized. Knowing the best time to hunt deer also helps, since cooler early-season mornings and late-season days give you a bigger window to cool your harvest.
Preventing Contamination
The gastrointestinal tract contains harmful bacteria including E. coli and other pathogens. If the stomach, intestines, or bladder rupture during field dressing, their contents can contaminate the meat with these dangerous bacteria. Proper technique prevents this contamination and ensures food safety for everyone who eats the meat.
Showing Respect for the Animal
Field dressing done properly is a sign of ethical hunting practice. It demonstrates that you value the animal’s sacrifice and are committed to using as much of it as possible. This practice is fundamental to hunting culture and conservation ethics.
🔧 Essential Tools & Pre-Hunt Preparation
Having the right tools prepared before you hunt makes field dressing faster, cleaner, and safer. Improvising with improper tools in the field creates unnecessary difficulty and increases contamination risk. For a full list of everything to pack beyond field dressing tools, see our complete deer hunting gear checklist.
Essential Tools Overview
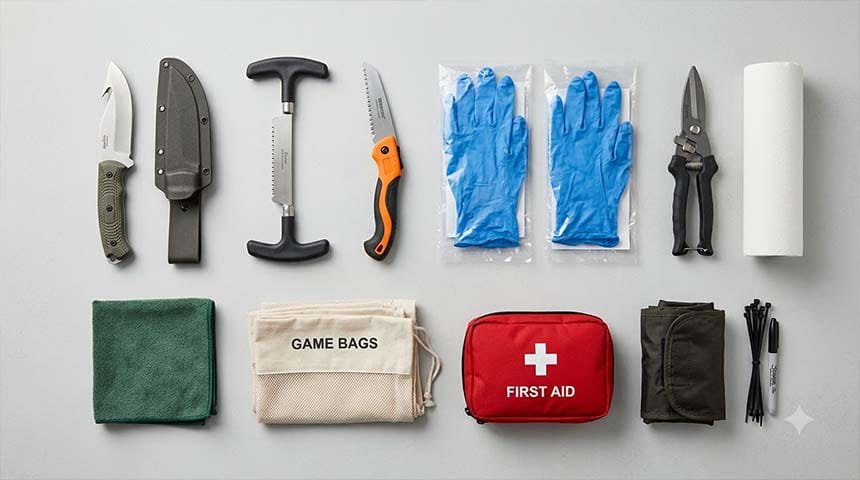
Keep all tools organized and sharp before heading to the field
Sharp Hunting/Gut Hook Knife
A quality hunting knife with a 3-4 inch blade is essential. Some hunters prefer a dedicated gut hook knife with a curved blade designed specifically for field dressing. The knife must be extremely sharp—a dull knife is dangerous and makes clean cuts impossible.
Bone Saw or Folding Saw
A bone saw (for the pelvic area) or folding saw makes cutting through heavy bone sections much easier. While not absolutely essential, it saves significant time and effort, especially for larger game animals.
Latex or Nitrile Gloves
Wearing gloves protects you from bacteria and blood-borne pathogens. Keep multiple pairs with you in case one tears. Medical-grade gloves are preferable to standard work gloves for better dexterity.
Sharp Shears or Scissors
Kitchen shears or hunting shears help cut through connective tissue cleanly. They’re especially useful for separating organs from membranes without damaging them.
Clean Towels or Paper Towels
Use clean towels to wipe excess blood and keep your work area manageable. Blood makes everything slippery and difficult to handle. Paper towels are preferable since they’re disposable.
Game Bags or Coolers
Have game bags or a cooler prepared to hold the organs and meat. Game bags allow air circulation and prevent flies while cooling the meat. Coolers with ice provide additional temperature control in warm weather.
Pre-Hunt Checklist
- Knife is sharp (test on paper—it should cut easily)
- All tools are clean and sanitary
- You have multiple pairs of gloves
- Cooler or game bags are clean and ready
- Paper towels or clean cloth available
- You know proper organ identification for your game
- You’re mentally prepared for the process
- You have first aid supplies if you cut yourself
⚠️ Critical Safety Fundamentals
Bloodborne Pathogen Awareness
Deer and other wild game can carry various pathogens including bacteria, viruses, and parasites. While most are harmless if handled properly, some can cause serious illness if they enter your body through cuts or contaminated hands. Chronic Wasting Disease (CWD) in deer is a serious concern in many regions—check your local regulations.
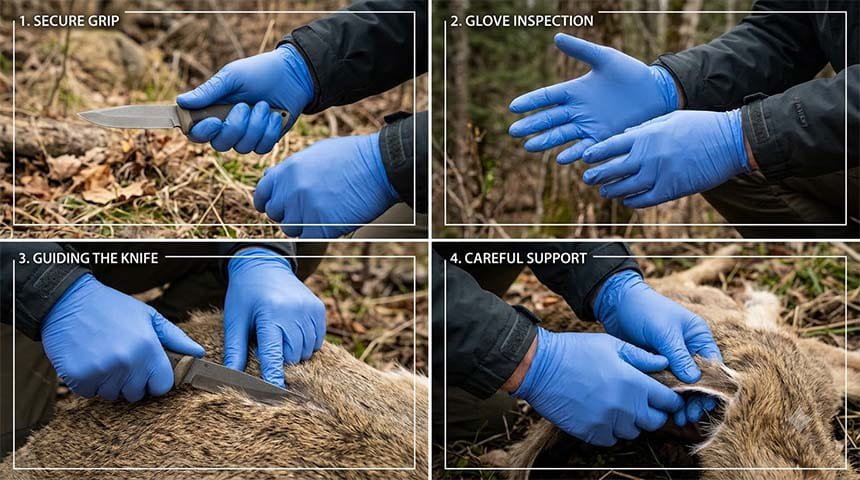
Proper glove usage prevents direct contact with blood and pathogens
Knife Safety Rules
- Always know where your knife blade is. Keep it pointed away from your body and other people. Make deliberate cuts, never slash or stab.
- Never cut toward yourself. Always cut away from your torso, hands, and legs. A slip with a sharp knife can cause serious injury.
- Secure the carcass position. Have the animal positioned stably so it won’t move unexpectedly during cutting. Unexpected movement causes knife slips and injuries.
- Keep the knife handle dry. Wet blood makes knife handles extremely slippery. Wipe your hand frequently and maintain a firm grip.
- Be aware of your surroundings. Other hunters or onlookers nearby could be injured if the carcass shifts suddenly.
Contamination Prevention
- Wear gloves throughout the process. Change gloves if they tear or become too contaminated.
- Avoid touching your face or other body parts. Keep your hands focused on the work area only.
- Never eat, drink, or smoke during field dressing. Ingesting contaminated material can cause serious illness.
- Wash your hands thoroughly after finishing. Use soap and water for at least 20 seconds, including under fingernails.
- Keep organs separate from meat. Do not allow stomach or intestinal contents to contact edible meat.
🔍 Critical Organ Identification & Location
Knowing exactly where each organ is located prevents accidental rupture and makes the process faster. Deer and other game have similar internal anatomy, though locations vary slightly by species.
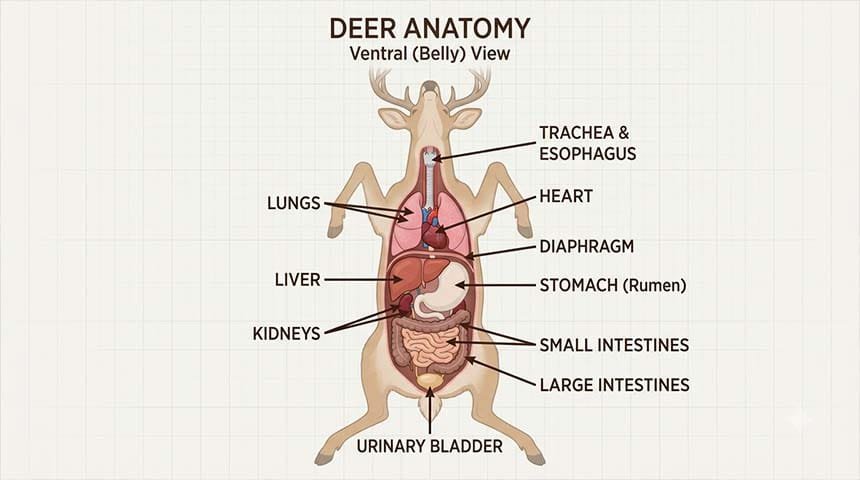
Anatomical diagram showing organ positions: lungs, heart, diaphragm, liver, stomach, intestines, bladder
Key Organs to Remove
Diaphragm
A thin muscle separating the chest cavity from the abdominal cavity. It’s attached along the inside of the ribcage. You must cut this to access the chest organs (lungs and heart).
Lungs & Heart
Located in the upper chest cavity. These organs are not edible and must be removed. The heart is the most forward organ, attached to major blood vessels and the diaphragm.
Liver
A large organ on the right side of the abdomen (left side from the animal’s perspective). It’s dark reddish-brown and attached to the right by connective tissue. Some hunters save the liver for eating—inspect it for spots or discoloration indicating disease.
Stomach & Intestines
Located in the lower abdomen. These organs contain partially digested food and dangerous bacteria. They must be removed carefully without rupturing. Accidental spills contaminate meat immediately.
Bladder
A small sac near the rear of the abdomen. Urine inside the bladder is sterile but contact with exposed meat is undesirable. Cut it free carefully without squeezing.
What NOT to Remove
The kidneys, attached to the rear of the abdomen, are edible and some hunters save them. However, if you’re not planning to eat them, they can be left in place or removed carefully. The hindquarters and visible muscle tissue are the primary meat you’re preserving—handle these areas with extra care to avoid contamination.
📋 The Complete Field Dressing Process – 10 Steps
Follow these steps in order for clean, efficient field dressing. This process should take 15-30 minutes depending on experience and animal size.
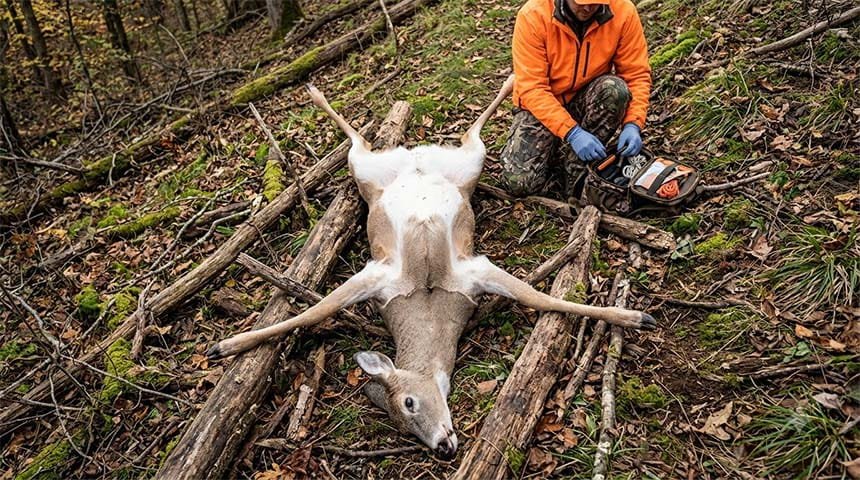
Position the animal on its back with hindquarters elevated to prevent spillage
Position the Animal Correctly
Place the animal on its back with the head downhill and rear end elevated slightly. This gravity-assisted positioning prevents organ fluids from flowing into the chest and contaminating premium meat. Secure the legs if necessary so the animal doesn’t roll during the process.
Make the Initial Cut (Sternum to Pelvis)
Starting at the sternum (breastbone), make a shallow cut down the centerline of the abdomen toward the pelvis. Keep the blade parallel to the abdomen, angling it slightly downward to avoid cutting the organs underneath. This incision should be 2-3 inches deep maximum. The goal is to open the abdomen without rupturing any organs inside.
Open the Diaphragm
Carefully cut the diaphragm where it attaches to the ribcage, working around all sides. This thin muscle is the only barrier between the abdomen and chest cavity. Once cut, you can access the lungs and heart. Use your hands to feel for the attachment and guide your knife to avoid cutting into the organs.
Remove the Lungs & Heart
Reach into the chest cavity and pull the lungs and heart forward. Cut the blood vessels and connective tissue holding them in place. These organs should separate cleanly from the body. Place them in a separate bag or container—they’re not edible.
Remove the Esophagus & Trachea
The esophagus and trachea extend from the throat into the chest. Cut these at the base of the neck or pull them down and cut them inside the chest cavity. This disconnects the stomach and digestive tract, preventing accidental spills when organs are removed.
Free the Liver (Optional Save)
The liver can be eaten if it looks healthy (no spots, discoloration, or unusual texture). Carefully cut the connective tissue holding it to the right side of the abdomen. Place it in a separate clean container if you’re saving it. If you’re not eating organ meat, simply leave it.
Remove Stomach & Small Intestines
Carefully pull the stomach and intestines out of the abdomen. Work slowly to avoid rupture. If the intestines are full, handle them extremely carefully—a break releases dangerous bacteria everywhere. Once separated, place them in the organ bag away from meat.
Free the Bladder
The bladder is near the rear of the abdomen. Carefully cut the connective tissue holding it. Do not squeeze or puncture it—urine spill will affect the meat quality. Remove it carefully and place in the organ bag.
Inspect & Clean the Cavity
Examine the remaining abdominal cavity for any remaining organs, debris, or tissue pieces. Use paper towels to wipe away excess blood. Look for the kidneys (if you want them) and remove any remaining organ parts. The cavity should be as clean as possible.
Cool the Carcass
Prop the abdomen open with sticks to allow air circulation and cooling. In cool weather, you can leave the carcass in the field to cool. In warm weather, place the carcass in the shade or hang it to allow air flow. Rapid cooling is critical for meat preservation.
📸 Visual Step-by-Step Progression
This visual guide shows the progression of field dressing in sequence. Each image corresponds to the steps above.
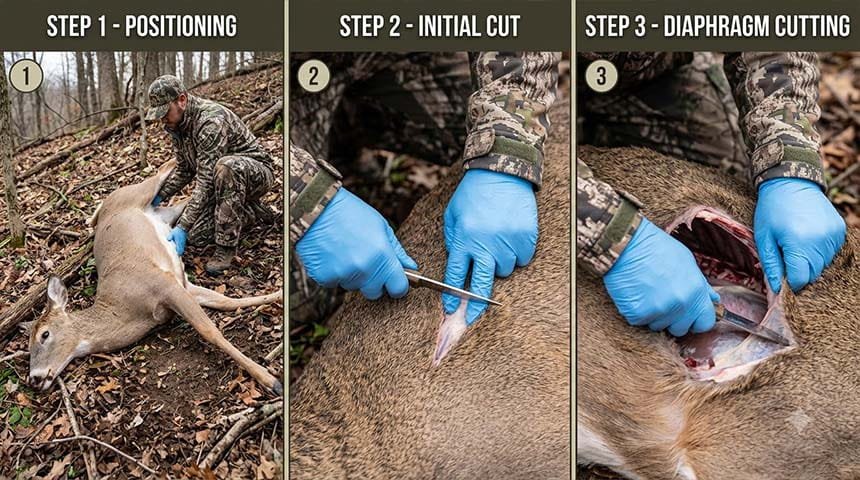
Steps 1-3: Position the animal, make the initial cut, and open the diaphragm
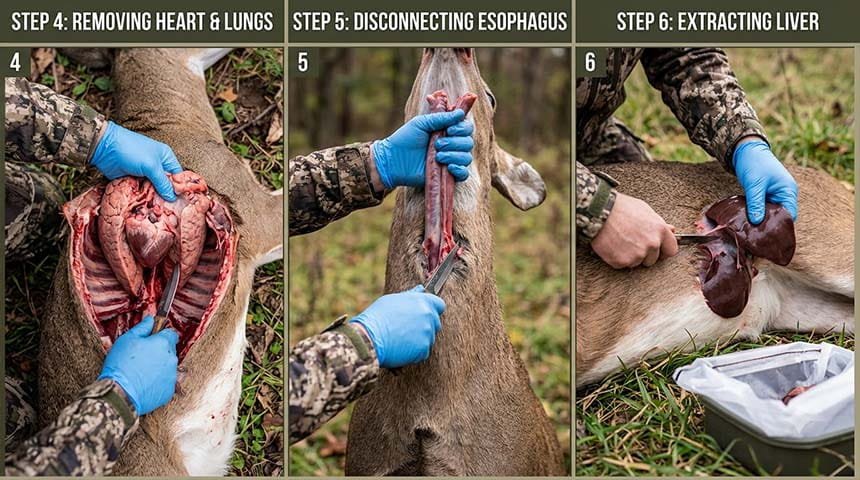
Steps 4-6: Remove heart & lungs, disconnect the esophagus, and extract the liver
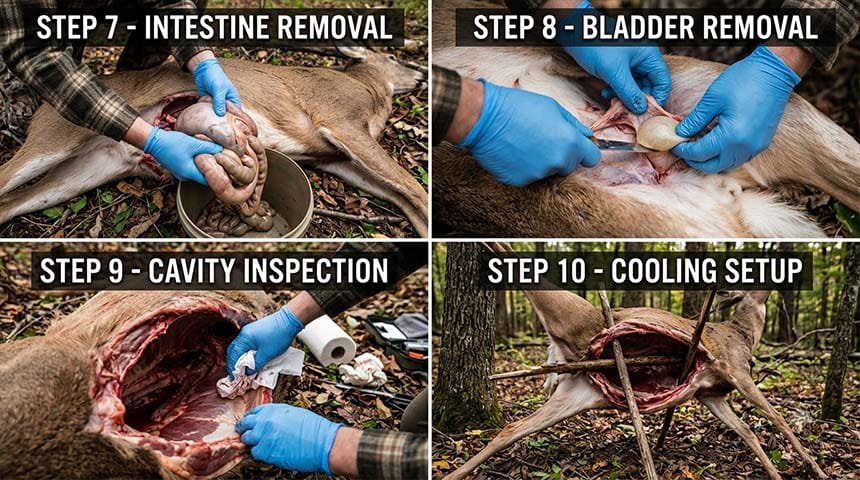
Steps 7-10: Remove intestines & bladder, inspect the cavity, and cool the carcass
❌ Common Mistakes & How to Avoid Them
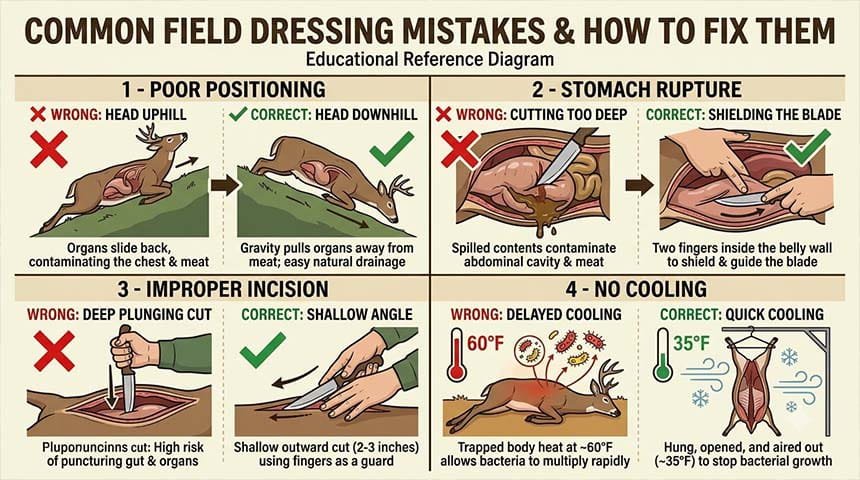
Common errors include stomach/intestine rupture, improper positioning, and contamination
Rupturing the Stomach or Intestines
Problem: Contents spill everywhere, contaminating all meat. Solution: Work slowly and deliberately. Use your eyes and hands to guide the knife around organs. If rupture happens, immediately separate contaminated meat from clean areas and rinse thoroughly.
Cutting Too Deep on Initial Incision
Problem: Blade pierces organs underneath, damaging them before you realize. Solution: Make a shallow cut (2-3 inches deep) on the initial incision. Let your fingers guide the knife under the abdomen muscle layer to protect organs below.
Improper Animal Positioning
Problem: Organs roll into the best meat areas, contaminating them. Solution: Always position the animal on its back with head downhill. This positioning uses gravity to keep organs away from the hindquarters and legs (the best meat).
Delaying the Process
Problem: Bacteria multiply and meat begins spoiling. Solution: Field dress immediately after harvest, even if you plan to move the animal later. The first 30 minutes are critical for meat preservation.
Not Cooling the Carcass Properly
Problem: Meat stays warm and spoils quickly in hot weather. Solution: Prop the cavity open immediately to allow air circulation. In warm weather, get the carcass to shade or higher elevation quickly. Ice or cold water can help in emergency situations.
Using a Dull Knife
Problem: Dull blades require more force, increasing slip risk and uncontrolled cuts. Solution: Sharpen your knife the night before the hunt. Test it on paper—it should cut easily. A sharp knife is safer and faster.
Not Wearing Protective Equipment
Problem: Direct contact with blood exposes you to bacteria and pathogens. Solution: Always wear latex gloves, even if you’ve field dressed hundreds of animals. Bloodborne pathogens are serious risks.
Mixing Contaminated & Clean Areas
Problem: One mistake spreads contamination throughout the carcass. Solution: Keep organs in a separate bag or container. If stomach contents spill, immediately isolate that area from the meat you plan to eat.
🧊 Meat Quality Preservation & Temperature Control
The Critical First Few Hours
The meat quality you achieve depends largely on temperature management during the first few hours after harvest. Bacteria multiply exponentially in the “danger zone” between 40°F and 140°F. Your goal is to get the meat temperature below 40°F as quickly as possible.
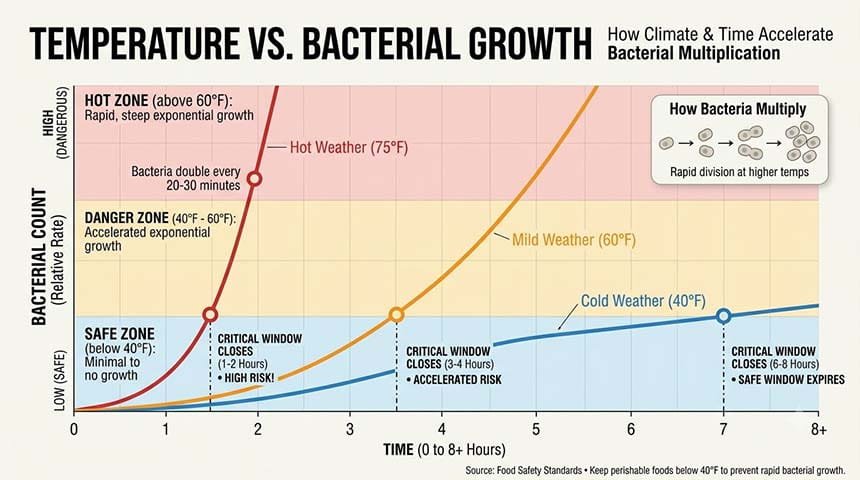
Temperature control is critical: bacteria multiply rapidly in warm conditions
Weather-Specific Cooling Strategies
| Weather Condition | Temperature Range | Strategy | Timeline |
|---|---|---|---|
| Cold Weather | Below 40°F | Hang carcass in shade to cool naturally. Prop abdomen open for air flow. | 12-24 hours for full cooling |
| Mild Weather | 40-60°F | Move to highest elevation possible. Use coolers with ice. Prop open. | 6-8 hours critical window |
| Warm Weather | 60-75°F | Ice immediately. Keep in shade. Hang if possible. Check temperature. | 3-4 hours critical window |
| Hot Weather | Above 75°F | Pack with ice immediately. Transport to processor ASAP. Use wet towels. | 1-2 hours critical window |
Hunting in cold weather? Staying warm and still in the stand helps you make a clean shot—see our picks for the best deer blind heaters.
Preventing Fly Infestation
Blowflies lay eggs on meat within minutes, and maggots can completely ruin a harvest. Use game bags (designed with breathable mesh to allow cooling while keeping flies out) or cheesecloth draped over the carcass. Avoid plastic coverings that trap heat and moisture, creating a perfect environment for fly reproduction.
Transportation Tips
- Transport the carcass off the ground if possible (use a game cart or pack frame)
- Keep it in shade during transport—avoid direct sunlight
- If using a vehicle, open the windows for ventilation during transport
- Place the carcass on ice or coolers rather than truck bed metal (which radiates heat)
- Minimize transport time—field dress and cool before traveling if possible
🔪 Processing to Table: Butchering the Carcass
Once the carcass is cooled and you’re ready to process meat further, several methods exist depending on your experience level and equipment.
Professional Processing vs. Home Processing
Professional Processing Services
Best for: First-time hunters, limited butchering experience, or preference for bone-in cuts. Advantages: Professional quality, proper food safety, various cut options. Cost: $50-150+ depending on species and options.
Home Butchering – Beginner Method
Best for: Budget-conscious hunters, learning experience. Method: Quarter the carcass (front and rear legs, backstraps), debone meat from large sections. Equipment needed: Sharp knife, cutting board, storage containers.
Home Butchering – Advanced Method
Best for: Experienced butchers wanting maximum meat recovery. Method: Precise muscle seam separation, grinding trim, making sausage. Equipment needed: Butcher’s knife set, bone saw, meat grinder, vacuum sealer.
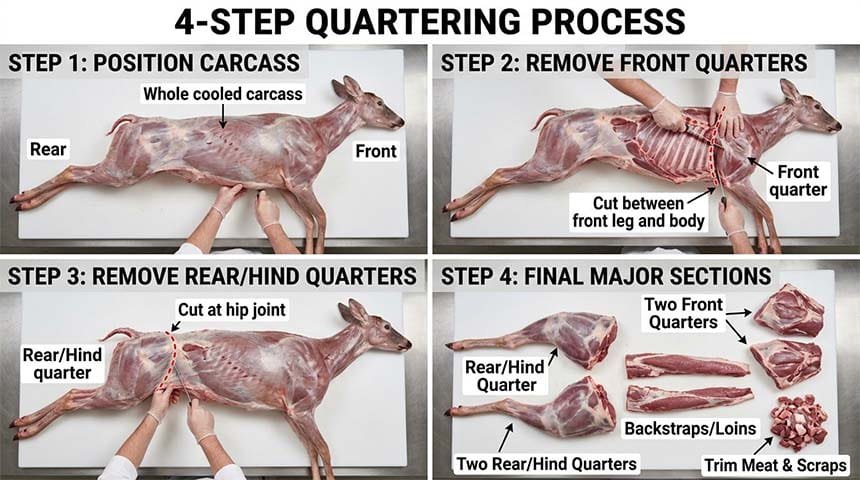
Basic quartering separates the carcass into hindquarters, front quarters, and backstraps
Prime Meat Cuts to Prioritize
- Backstraps (Loins): The most tender cuts, best for steaks or roasting. Run along both sides of the spine.
- Hindquarters (Hams): Largest meat section, good for roasts, steak, or grinding into burger.
- Front Shoulders: Tougher meat, best for stewing, braising, or grinding.
- Trim Meat: Good for grinding into burger, sausage, or stew meat.
Storage Options
Refrigerator Storage (Short-term)
Keep meat at 35-40°F. Use within 3-5 days. Best for meat you’ll use immediately. Keep on lower shelves to prevent cross-contamination.
Freezer Storage (Long-term)
Keep at 0°F or below. Properly wrapped meat lasts 8-12 months. Use vacuum-sealed bags or multiple layers of plastic wrap to prevent freezer burn.
Dry Curing/Smoking (Specialty)
Salt-cured or smoked meat lasts months without refrigeration. Requires proper technique to prevent spoilage. Good for jerky or prosciutto.
❓ Frequently Asked Questions
🆘 Troubleshooting Real-World Scenarios
✅ Complete Field Dressing Checklist
- Sharpen all knives and test blade sharpness
- Gather and inspect all tools (use our gear checklist)
- Pack gloves (multiple pairs) and paper towels
- Prepare coolers or game bags
- Review organ locations and anatomy
- Check local regulations and seasons
- Wait 15-30 minutes for animal to relax (prevents tainting)
- Put on latex gloves and prepare work area
- Position animal on back, elevated at rear
- Begin field dressing without delay
- Follow step-by-step process carefully
- Separate organs into dedicated container
- Cool carcass immediately—don’t delay
- Prop abdomen open for air circulation
- Move to shade or cool location
- Use game bags to prevent fly infestation
- Check meat temperature if thermometer available
- Adjust strategy based on weather conditions
- Transport to cool location as soon as practical
- Keep carcass on ice if warm weather
- Don’t expose meat to direct sunlight
- Get meat to processor or freezer within 24 hours
- Vacuum seal or wrap tightly before freezing
- Label with date and animal species
- Wash hands and all surfaces thoroughly
- Never eat or drink during field dressing
- Dispose of organs properly per regulations
- Inspect meat before cooking for spoilage signs
- Cook ground meat to 160°F, steaks to 140°F minimum
- Check local CWD and disease regulations
🎯 Final Thoughts: Mastering Field Dressing
Field dressing is a skill that separates successful hunters from those who waste their harvest. The process isn’t complicated, but it requires preparation, focus, and commitment to doing it right. Your first attempt may feel awkward or slow, but with practice, field dressing becomes second nature.
Remember that you’re honoring the animal’s sacrifice by ensuring maximum meat recovery and quality. Every step in this guide exists for a reason—to prevent spoilage, eliminate contamination, and preserve the meat that will nourish you and your family. Take pride in mastering this essential skill.
The best hunters are the ones who invest time in learning proper techniques before they ever need them. Read this guide again before your hunt. Watch videos to see the process in action. Practice with an experienced hunter if possible. Better scouting, such as learning how to scout deer like a pro, leads to more successful hunts, and understanding whether deer eat fruit or how to attract deer without baiting can improve your odds in the field. When you harvest an animal, you’ll be confident and prepared to handle it professionally from field to table.
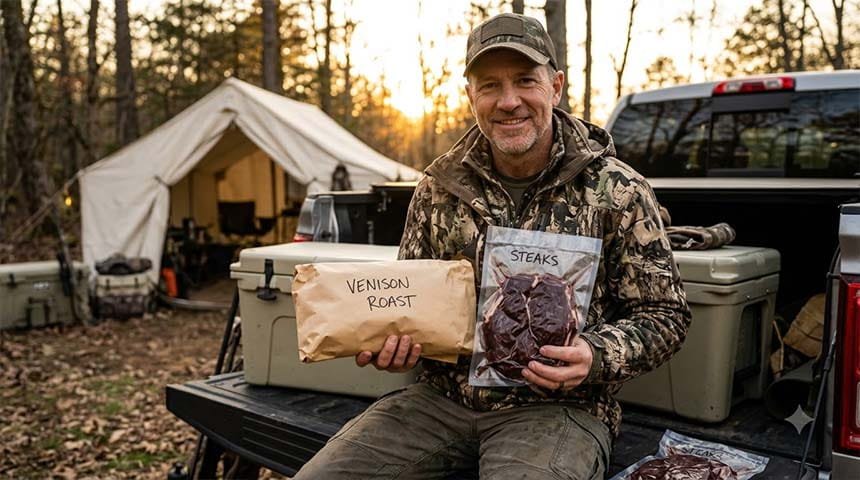
Proper field dressing ensures quality meat and honors your harvest
📚 Related Deer Hunting Guides
Continue learning with these helpful guides from our site:
This guide is for educational purposes and represents general hunting practices. Always follow your local, state, and federal hunting regulations. Hunting seasons, methods, and legal requirements vary by location. Check with your local game and fish department before hunting. This guide assumes you have proper hunting licenses, tags, and are hunting legally. Individuals with health conditions, pregnancy, or compromised immune systems should consult medical professionals before handling raw game meat. When in doubt about food safety, consult a professional processor or your local health department.

Leave a Reply